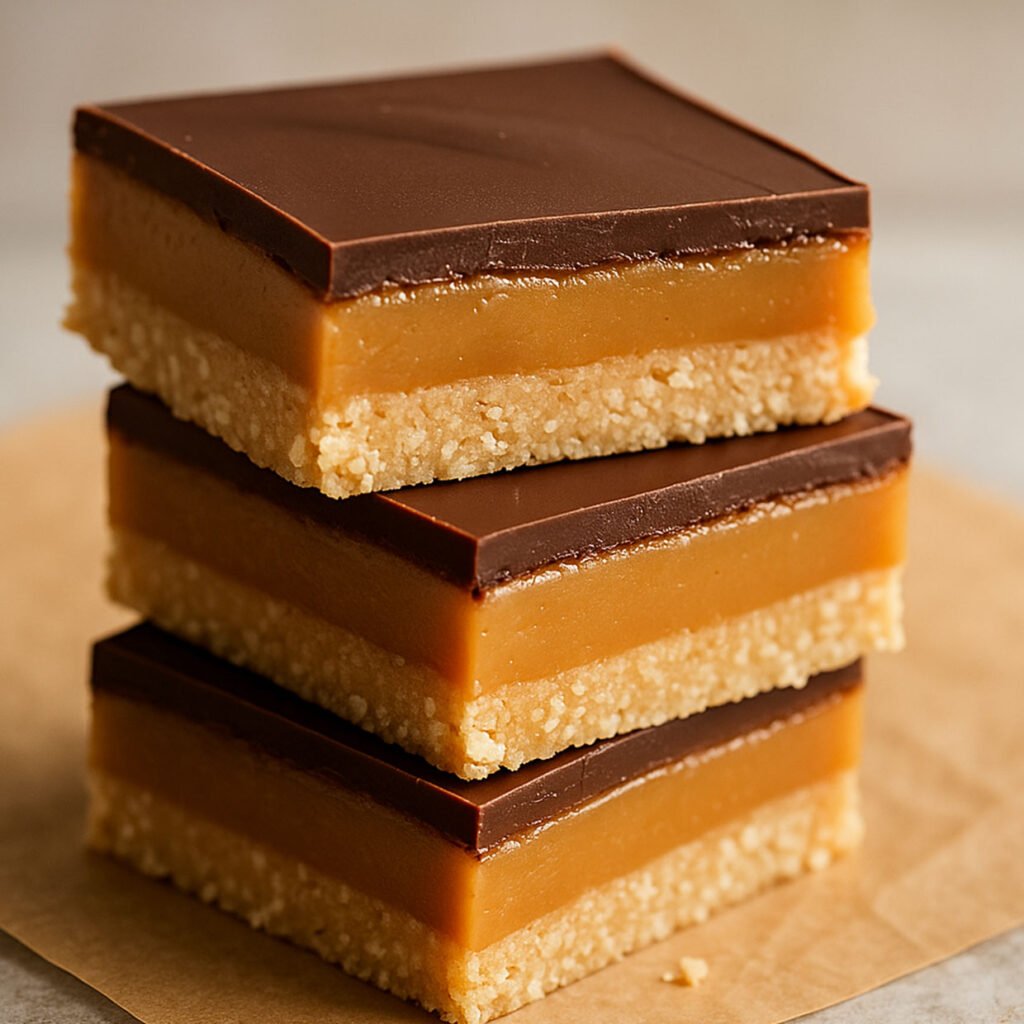
There are recipes you learn because you should, and then there are recipes you learn because people won’t stop asking you to bring them. This caramel slice recipe is firmly in the second camp. It’s the tray bake that disappears first at school fetes, work morning teas, and family BBQs, three layers of bliss: a crisp coconut biscuit base, creamy caramel in the middle, and a glossy chocolate top that snaps cleanly when you cut it.
If you’ve ever wondered how to make caramel slice so it sets every time without burnt caramel, greasy separation, or a chocolate layer that shatters into a mess, you’re in the right place. I’ve tested this caramel slice recipe for years in my Newcastle kitchen and tweaked the ratios to hit that sweet spot: rich but not cloying, firm enough to slice neatly, yet soft enough to melt on your tongue. We’ll talk caramel slice ingredients, pan size, stovetop cues, and the small, smart steps that make a big difference.
Whether you searched for “Easy Caramel Slice,” “Australian recipes,” or “How long does caramel slice last?,” this guide walks you through everything. It’s classic Australian cuisine a favourite in australian desserts, and although it sometimes shows up on party platters lumped into Australian Appetizer Recipes lists, I think of it as the feel-good sweet we all grew up with. By the end, you’ll have a reliable caramel slice recipe you can bake on autopilot and proudly share.
Table of Contents
A Little Story: Nan’s Lunchbox Trade
When I was ten, my Nan wrapped two squares of caramel slice in greaseproof paper and tucked them into my lunchbox “for trading leverage.” At recess, I swapped one square for two homemade piklets and still had classmates hovering for crumbs. That day I learned three things: this slice turns friends into best friends, people love easy recipes that taste like effort, and Nan was a genius negotiator. Years later, when I started developing my own caramel slice recipe, I kept asking: would my slice be worthy of a playground trade? This one passes with honours.
What Is Caramel Slice?
Caramel slice—often called caramel shortbread or millionaire’s shortbread elsewhere—has an Aussie twist: a coconut biscuit base, a stovetop condensed-milk caramel, and a chocolate top (typically milk or dark) set with a touch of oil to prevent a tooth-cracking shatter. The goal is contrast: a lightly crunchy base, silky creamy caramel, and a thin chocolate snap.
In the world of Australian recipes, it sits alongside lamingtons and Anzac biscuits as a bake-sale favourite. While there are countless versions, a good caramel slice recipe pays attention to three ratios:
- Base thickness: sturdy enough to hold the caramel but not so thick that it steals the show.
- Caramel height: generous, smooth, and sliceable.
- Chocolate layer: thin but complete, with a clean cut.
Why This Caramel Slice Recipe Works
- Right ratios for a neat slice: 1 part base : 1.5 parts caramel : 0.5 part chocolate.
- Golden-syrup caramel cooked low and slow for 8–10 minutes—no graininess, no separation.
- Two-stage cool and chill for layers that stay in place.
- Chocolate topping with a teaspoon of neutral oil so it sets with a gentle snap (and doesn’t bloom).
- Metric measures and pan size that match most Aussie slice tins (20 × 30 cm / 8 × 12 in).
This is a true Easy Caramel Slice you can bake mid-week, yet polished enough for a celebration.
Pan, Tools, and Lining Tips
- Pan size: 20 × 30 cm slice tin gives ideal thickness. A 23 cm square pan works too; slices will be slightly taller.
- Lining: Grease lightly, then line with baking paper, leaving overhang on the long sides for lifting.
- Equipment: Medium saucepan (heavy-based), silicone spatula, small offset spatula for spreading, digital scales for consistency, and a sharp, long knife for slicing.
Caramel Slice Ingredients (Deep Dive)
Here’s the classic list, plus why each one matters. If you need a printable list, it’s in the full recipe card below.
Biscuit Base
- Plain flour: structure without heaviness.
- Desiccated coconut: the Australian touch—adds gentle chew and flavour.
- Brown sugar: moisture and caramel notes.
- Unsalted butter: richness and crispness when baked.
- Pinch of salt: wakes up the base.
Caramel Layer
- Sweetened condensed milk (not evaporated): the backbone of a smooth, creamy caramel.
- Unsalted butter: emulsifies and keeps the caramel glossy.
- Golden syrup: the signature Australian flavour and the key to a rich, toffee-like finish.
- Brown sugar: deepens flavour and colour.
- Vanilla extract: rounds out the edges.
- Salt: essential—even if you add flaky salt later.
Chocolate Topping
- Dark or milk chocolate: use good eating chocolate (45–50% cocoa is lovely).
- Neutral oil (1–2 tsp): creates a softer set that still slices with a snap.
Ingredient Australian caramel slice translations if you’re outside Australia: golden syrup = light treacle (Lyle’s), plain flour = all-purpose flour, dark chocolate = semi-sweet.
How to Make Caramel Slice (Step by Step)
This is the “why” behind each move so your caramel slice recipe works first time and every time.
Step 1: Make and Bake the Base
Combine flour, coconut, brown sugar and a pinch of salt. Stir in melted butter until the mixture looks like damp sand. Press it into your lined tin with the back of a spoon. Dock lightly with a fork and bake at 180°C fan (200°C conventional) for 12–15 minutes until golden. A properly baked base keeps the caramel from soaking in.
Step 2: Cook the Caramel Low and Slow
In a heavy saucepan, combine condensed milk, butter, golden syrup, brown sugar and salt. Cook over low-medium heat, stirring constantly with a silicone spatula, for 8–10 minutes. Watch for these cues:
- It will loosen, then thicken.
- Colour shifts from pale to golden-toffee.
- When you drag the spatula, it leaves a slow-closing trail.
If you see flickers of brown specks, reduce the heat. The aim is gentle bubbling—think soft blips, not a boil. Overcooking can make caramel oily or grainy. Remove from heat, stir in vanilla, and pour over the warm base. Smooth quickly.
Step 3: Set, Then Top With Chocolate
Let the caramel cool at room temperature for 20–30 minutes (just until it feels set to the touch). Melt the chocolate with oil in short bursts in the microwave or over a water bath. Spread over caramel and tap the pan firmly on the bench to release bubbles. Chill 45–60 minutes—just until the chocolate sets. If it gets rock hard, it can shatter when you slice; a short chill is perfect.
Step 4: Slice Like a Pro
Lift out using the paper. Warm your longest knife under hot water, wipe dry, then cut in one confident motion. Wipe and rewarm between cuts. You’ll get those beautiful, clean edges that make your caramel slice recipe look bakery-made.
Texture, Ratios, and Troubleshooting
Even the best bakers have questions. Here’s how to steer clear of common pitfalls.
My Caramel Split. Can I Save It?
Sometimes the fat separates if the heat is too high. Pull the pan off the heat and whisk in a tablespoon of ice-cold milk; the sudden temperature change can bring it back together. If it’s still stubborn, blitz briefly with a stick blender. Prevention is better: keep the heat moderate and stir constantly.
The Chocolate Cracked When Slicing
Two fixes: add 1–2 teaspoons neutral oil to the melted chocolate (already in this recipe) and don’t over-chill. If it still cracks, warm your knife more thoroughly between cuts.
Base Too Hard or Too Soft
Over-baking makes it hard; under-baking leaves it soft and absorbent. Aim for lightly golden edges. If you prefer a slightly softer base, reduce bake time by a minute or two.
Caramel Too Runny
It either needed a couple more minutes on the stove or more cooling time before chocolate. Next time, cook until the caramel holds its shape for a beat when you run a spatula through it.
Caramel Too Firm or Chewy
That comes from cooking it too hot or too long. Keep the heat gentle; you want slow bubbles and steady thickening.
Variations You’ll Love
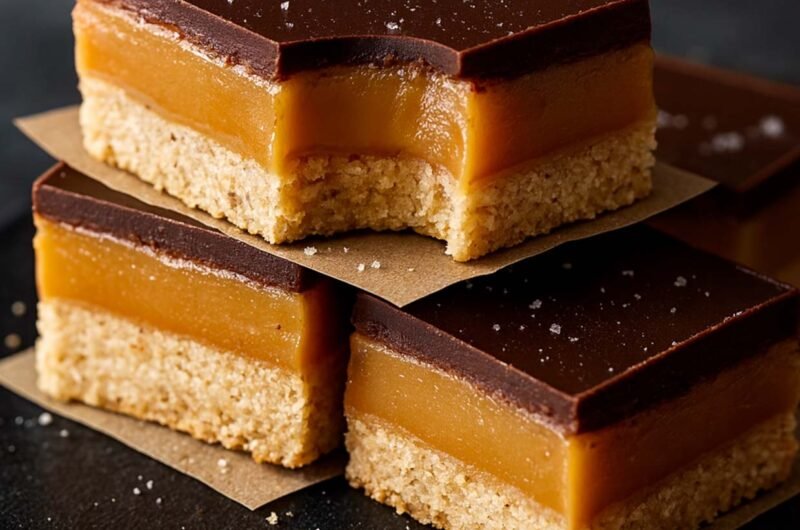
- Salted Caramel Slice: Sprinkle flaky sea salt over the chocolate before it sets.
- Macadamia Crunch: Press a handful of chopped macadamias into the base.
- Anzac Base: Swap the base for an Anzac biscuit mixture for a deeper oat flavour.
- Biscoff Twist: Replace half the brown sugar in the base with crushed Biscoff biscuits for spice.
- Milo Top: Whisk 1–2 teaspoons Milo into the melted chocolate for a subtle malt note.
- Gluten-Free: Use a plain gluten-free flour blend; the rest is naturally GF.
- Dairy-Free: Use coconut condensed milk and dairy-free butter and chocolate; the flavour leans caramel-coconut and is delicious.
Make-Ahead, Storage, and Freezing
Here’s the most asked question: How long does caramel slice last? In an airtight container, it keeps 5–7 days in the fridge. For the cleanest bite and shine, serve at cool room temperature. It also freezes well for up to 3 months—layer squares with baking paper. Thaw in the fridge overnight, then bring to room temp before serving.
Serving Ideas and Occasions
Caramel slice suits pretty much every occasion: school bake sales, office birthdays, picnics, and Christmas dessert tables. For parties, cut into small squares and arrange on a platter with seasonal berries for colour. If you’re building a grazing table—even though it’s not truly in Australian Appetizer Recipes this slice sits happily alongside lamington bites and fruit skewers for a sweet finish.
Nutrition Notes
This is a treat. I keep squares small—5 × 5 cm—and serve with coffee or tea. If you want a lighter take, use 50% dark chocolate, reduce the base sugar slightly, and cut smaller pieces. But honestly, part of the charm of a classic caramel slice recipe is its unapologetic indulgence.
Caramel Slice Recipe (Perfectly Set, With a Clean Chocolate Snap)
Course: DessertCuisine: AustralianDifficulty: Easy4
servings20
minutes25
minutesA reliable, bakery-style caramel slice recipe with a crisp coconut biscuit base, thick creamy caramel, and a glossy chocolate top that slices cleanly. An Easy Caramel Slice you’ll make on repeat, perfect for bake sales, lunch boxes, and celebrations across Australian cuisine.
Ingredients
- For the coconut biscuit base
160 g plain flour (1 ¼ cups)
75 g desiccated coconut (1 cup, loosely packed)
90 g brown sugar (½ cup, packed)
130 g unsalted butter, melted (⅔ cup)
Pinch of fine salt
- For the caramel layer
395 g can sweetened condensed milk (1 can)
120 g unsalted butter, cubed (½ cup)
100 g brown sugar (½ cup, packed)
80 g golden syrup (¼ cup)
¼ tsp fine salt
1 tsp vanilla extract
- For the chocolate topping
220 g dark or milk chocolate, chopped
1–2 tsp neutral oil (sunflower or canola)
Directions
- Prep and base: Heat oven to 180°C fan (200°C conventional). Grease and line a 20 × 30 cm slice tin with baking paper, leaving overhang. Combine flour, coconut, brown sugar and salt in a bowl. Stir in melted butter until evenly damp. Press into tin, smoothing with the back of a spoon. Bake 12–15 minutes until light golden.
- Cook caramel: In a medium heavy-based saucepan, combine condensed milk, butter, brown sugar, golden syrup and salt. Stir over low-medium heat until melted, then keep stirring 8–10 minutes, allowing gentle bubbles. The caramel will thicken and turn golden; when you drag a spatula through, it leaves a slow-closing trail. Remove from heat, stir in vanilla.
- Layer: Pour caramel over warm base. Smooth quickly and evenly. Let sit at room temp 20–30 minutes, until just set to the touch.
- Chocolate top: Melt chocolate with oil in 20–30 second bursts in the microwave, stirring between, or over a bowl of barely simmering water. Pour over caramel and tilt to cover; tap the pan on the bench to knock out bubbles. Chill 45–60 minutes until set.
- Slice: Lift out using paper. Warm a long knife under hot water, dry, and cut into 24 squares. Wipe and rewarm between cuts for ultra-clean edges.
Notes
- Pan size matters: A smaller pan makes thicker layers; add 5 minutes cooling before chocolate so the centre sets.
Salted caramel option: Stir ½ tsp flaky sea salt into the caramel after removing from heat; sprinkle extra on the chocolate.
No golden syrup? Use light corn syrup plus ½ tsp molasses, or mild honey (flavour will change slightly).
Dairy-free: Use coconut condensed milk and dairy-free butter and chocolate.
Gluten-free: Swap flour for a 1:1 GF blend.
Neat tops: For a mirror finish, warm the tin base for 5–10 seconds over a barely warm stovetop after pouring chocolate; it levels beautifully.
Storage: See FAQ—this answers How long does caramel slice last?
Australian recipes you might like to try
Frequently Asked Questions (FAQs)
How long does caramel slice last?
In an airtight container, it keeps 5–7 days in the fridge. Bring to room temperature before serving for the best texture. It also freezes well for up to months layer pieces with baking paper.
Can I double this caramel slice recipe?
Yes. Use two 20 × 30 cm tins or a large rimmed sheet pan. Keep stovetop caramel over gentle heat and extend the cook by a minute or two until you see slow, thick bubbles.
Why did my chocolate topping bloom or look streaky?
Moisture or temperature shock can cause bloom. Dry your bowl and spatula thoroughly, stir in a teaspoon of neutral oil, and avoid storing the slice in very cold fridge zones.
Can I make an Easy Caramel Slice without coconut?
Absolutely. Replace the coconut with 60 g extra flour (½ cup) and add ½ tsp vanilla to the base. You’ll get a classic shortbread texture.
Is this part of Australian Appetizer Recipes or dessert?
It’s firmly dessert, but Aussies often put small squares on grazing tables and party platters so you’ll sometimes see it grouped with appetisers. In any case, it’s a star of Australian desserts
When you master a reliable caramel slice recipe, you gain more than a crowd-pleaser, you gain a little tradition. The coconut base brings the Aussie flavour, the creamy caramel makes it nostalgic, and the clean-cut chocolate top makes it look as good as it tastes. With the low-heat caramel technique, smart ratios, and slicing tips in this guide, you’ll turn out perfect squares every time.
So preheat the oven, line your tin, and make this your signature. Whether you bake it for school fundraisers, office shouts, or quiet cups of tea, this caramel slice recipe will earn you repeat requests, and maybe a few lunchbox trades of your own.


Leave a Reply